您现在的位置是:主页 > news > 做学历的网站/智能建站模板
做学历的网站/智能建站模板
![]() admin2025/4/22 22:38:32【news】
admin2025/4/22 22:38:32【news】
简介做学历的网站,智能建站模板,wordpress远程ftp,网站页面安全监测建设方案一。 nginx安装 在虚拟机需要关闭防火墙,在服务器需要在安全组开启相应的端口。 systemctl status firewalld.service#(查看状态) systemctl stop firewalld.service #关闭 systemctl disable firewalld.service #禁止安装四个编译插件 yum -y install gcc pcre …
一。 nginx安装
在虚拟机需要关闭防火墙,在服务器需要在安全组开启相应的端口。
systemctl status firewalld.service#(查看状态)
systemctl stop firewalld.service #关闭
systemctl disable firewalld.service #禁止
安装四个编译插件
yum -y install gcc pcre pcre-devel zlib zlib-devel openssl openssl-devel
安装步骤
- 直接下载.tar.gz安装包
https://nginx.org/en/download.html - 上传到自己的目录,比如/usr/local/software
- 解压缩
tar -zxvf  nginx-1.20.2.tar.gz
cd nginx-1.20.2
- 配置
./configure --prefix=/usr/local/nginx
- 编译并且安装
make & make install
- 查看nginx安装路径
whereis nginx
- 加入系统服务
vim /etc/systemd/system/nginx.service
[Unit]
Description=nginx service
After=network.target[Service]
Type=forking
ExecStart=/usr/local/nginx/sbin/nginx
ExecReload=/usr/local/nginx/sbin/nginx -s reload
ExecStop=/usr/local/nginx/sbin/nginx -s stop
PrivateTmp=true[Install]
WantedBy=multi-user.target- 重新加载systemd并启动服务查看状态
systemctl damon-reload
systemctl start nginx
systemctl enable nginx
systemctl status nginx
- 查看进程
ps -aux | grep nginx
二. nginx进程
nginx有有主进程和work进程之分

三 nginx配置
配置文件在/usr/local/nginx/conf/nginx.conf下
- 配置模式连接数
# 设置worker数量
worker_processes 2;
# 配置worker权限
user root;events {# 默认使用epolluse epoll;# 为每个worker设定允许最大连接数worker_connections 10240;
}
- 使用gzip对资源文件进行压缩
# 开启gzip压缩功能 提高文件传输效率
gzip on;
# 限制最小压缩 小于1字节不压缩
gzip_min_length 1;
# 定义压缩级别
gzip_comp_levle 3;
- 根据需求设定keepalive,tcp保持连接的时间
# 单位秒
keepalive_timeout 65;
- 启动 tcp_nopush
# tcp_nopush 会将请求打包再分发,提高带宽利用
sendfile on;
tcp_nopush on
- nginx解决跨域,与在spring后端解决方式大致相同,在service里面添加
#允许跨域请求的域,*代表所有
add_ header ' Access-Control-Allow-0rigin' *;
#允许带上cookie请求
add_ header ' Access-Control-Allow-Credentials' 'true';
#允许请求的方法,比如GET/POST/PUT/DELETE
add_ header ' Access-Control-Allow-Methods' *;
#允许请求的header
add_ header ' Access-Control-Allow-Headers' *;
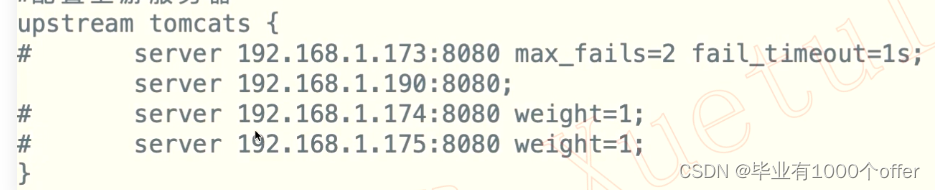
- nginx upstream参数
- nginx upstream指令参数
- max_conns 节点的最大连接数
- slow_start 缓慢启动时间
- down 节点下线
- backup 备用节点
- max_fails 允许的最大失败数
- fail_timeout 超过最大失败数后的等待时间
- nginx实现动静分离,静态代码直接返回,动态代码需要转发服务
location ~ .*\.(html|htm|gif|jpg|jpeg|bmp|png|ico|js|css)$ {root html;index index.html;}location /api {proxy_pass http://192.168.10.88:8080;proxy_set_header Host $host;proxy_set_header X-Real-IP $remote_addr;proxy_set_header X-Forwarded-For $proxy_add_x_forwarded_for;}- nginx负载均衡策略
- 默认轮训
- weight权重,weight=1直接在服务后面加上
- 连接数少的优先 leash_conn
- ip_hash,有一致性哈希和普通哈希之分,大致是普通哈希在一台服务器挂掉或者新增节点之后会重新计算hash,导致大量更改,二一致性哈希由于呈现环状,而无需大量更改。
四 keepalive安装
- 下载keepalive安装包
http://www.keepalived.org/software/ - 解压 tar -zxvf …
- cd 目录
- 编译
./configure --prefix=/usr/local/keepalived --sysconf=/etc
- make & make install
- 增加系统服务同nginx,只需要把启动路径改掉
- 启动服务
五。keepalive介绍和配置
keepalived 是监控集群系统中的服务节点的工具,如果服务出现异常则剔除,若节点恢复则重新加入,还有VRRP协议的功能,实现虚拟录用协议,解决动态虚拟路由,可以和nginx配合使用,来实现nginx的HA.
VRRP协议。
是一种主备模式的协议,可以将多条物理路由器虚拟成一个虚拟的路由器,从而使用虚拟ip对外进行提供服务,从而实现对用户透明的来转发到各个真是的服务器。
keepalived工作原理
- keepalived在网络层采用的最常见的工作方式是通过ICMP协议向集群中的每个节点发送一个ICMP的数据包(类似于Ping),如果某个节点没有返回响应的数据包,那么就认为此节点发生了故障,keepalived将报告此节点失效,并从集群中剔除;
- keepalived在传输层就是利用TCP协议的端口连接和扫描技术来判断集群节点是否正常的;
- keepalived可以分为用户层和内核层
- ipvs模块,来实现基于ip的负载均衡,并还可以跟LVS一起来实现一套负载均衡集群。
keepalived配置
keepalived的配置文件可以由keepalived.conf.sample复制一个keepalived.conf
global_defs {#机器的hostnamerouter_id jx-nginx-11
}
#配置脚本,和脚本路径
vrrp_script check_nginx_alive{script "/etc/keepalived/check_nginx_alive_or_not.sh"interval 2weight 10}#配置高可用
vrrp_instance VI_1 {#主从节点,有MASTER|BACKUPstate MASTER#网卡interface eth0virtual_router_id 51priority 100advert_int 1#authentication {auth_type PASSauth_pass 1111}#配置执行脚本track_script{check_nginx_alive}#虚拟ipvirtual_ipaddress {10.10.10.150}#健康检测TCP_CHECK {connect_port 80connect_timeout 3nb_get_retry 3delay_before_retry 3}}
主从热备
- 配置虚拟ip
首先在/etc/sysconfig/network-scripts/找到ifcfg-eth0或者你的主机网卡的名字,复制一份
cp ifcfg-eth0 ifcfg-eth0:1
vim ifcfg-eth0:1
修改内容如下,即时配置了一个eth0:1的虚拟地址为10.10.10.150的虚拟地址,虚拟地址要符合你自己的子网ip段、。
DEVICE="eth0:1"
BOOTPROTO="static"
ONBOOT="yes"
IPADDR=10.10.10.150
NETMASK=255.255.255.0
重启网卡
service network restart
查看虚拟ip,即出现了一个150的虚拟ip
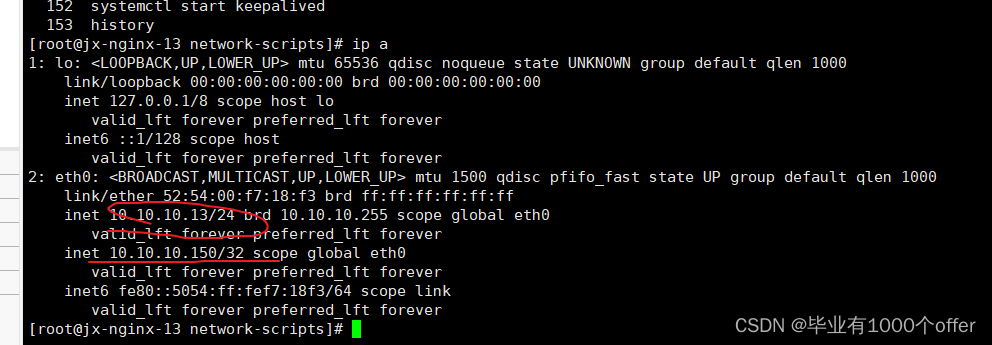
然后相同的配置配置另一台服务器的keepalived为BACKUP,也配置为150虚拟ip
这样的话,在访问10.10.10.150:80即可访问到两台真实服务器的内容了,模拟其中MASTER节点的宕机,则BACKUP节点立马生成虚拟ip,并可以用虚拟ip进行访问。
双柱热备配置
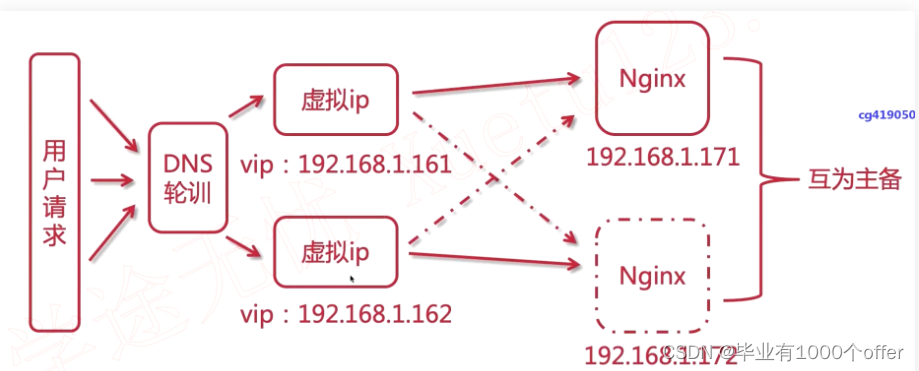
主节点配置
global_defs {router_ id v171
}vrrp_ instance VI _1 {state MASTERinterface eth0virtual_ router_ id 51priority 100advert_ int 1authentication {auth_type PASSauth_ pass 1111}virtual_ ipaddress {10.10.10.161}
}
vrrp_ instance VI _2 {state BACKUPinterface eth0virtual_ router_ id 52priority 80advert_ intauthentication {auth_ type PASSauth_ pass 1111}virtual_ ipaddress {10.10.10.171}
}
备用节点配置
global__defs {router_ id keep_172
}
vrrp_ instance VI_ 1 {state BACKUPinterface eth0virtual_ router_id 51priority 80advert_ int 1authentication {auth_ type PASSauth_ pass 1111}virtual_ ipaddress {10.10.10. 161}
}
vrrp_ instance VI _2 {state MASTERinterface eth0virtual_ router_ id 52priority 100advert_ int 1authentication {auth_ type PASSauth_ pass 1111   }virtual_ ipaddress {10.10.10.162}
}
这样可以使两个节点都在工作,而不造成服务器浪费。
六 LVS
需要安装
yum install ipvsadm
在两台服务器上均安装并配置新的网卡
比如加入150虚拟网卡作为虚拟ip
在另外两个真实访问的节点配置回环网卡lo,
vim /etc/sysctl.conf
#添加一下内容
net.ipv4.conf.lo.arp_ignore=1
net.ipv4.conf.lo.arp_announce=2
net.ipv4.conf.all.arp_ignore=1
net.ipv4.conf.all.arp_announce=2
net.ipv4.conf.default.arp_ignore=1
net.ipv4.conf.default.arp_announce=2
#保存退出,并让生效哦sysctl -p
新增回环网卡
在/etc/sysconfig/network-scripts/目录下新增一个 ifcfg-lo:1配置其名字和虚拟ip地址
这样即可通过DR模式进行用虚拟ip访问两台服务了。
LVS简介和模式
LVS是虚拟服务器,有三种模式,NAT模式,TUN模式和DR模式
- DR模式:通过直接路由实现虚拟服务器。DR模式是通过改写请求报文的目标MAC地址,将请求发给真实服务器的,而真实服务器响应后的处理结果直接返回给客户端用户。DR模式可以极大的提高集群系统的伸缩性,而且DR模式没有IP隧道的开销,对集群中的真实服务器也没有必要必须支持IP隧道协议的要求。但是要求调度器与真实服务器都有一块网卡连接到同一物理网段上,必须在同一个局域网环境。
- 原理:LVS通过控制IP来实现负载均衡。ipvsadm是其具体的实现模块。
- ipvsadm的主要作用:安装在调度器上面,在调度器上虚拟一个对外访问的IP(VIP)。用户访问VIP,到达调度器,调度器根据一定的规则选择一个真实服务器,处理完成后然后返回给客户端数据。