您现在的位置是:主页 > news > 北京网站建设价位/西安快速排名优化
北京网站建设价位/西安快速排名优化
![]() admin2025/4/20 3:52:43【news】
admin2025/4/20 3:52:43【news】
简介北京网站建设价位,西安快速排名优化,南通做外贸的公司网站,wordpress播放器创建vue代码模板: 编写vue代码模板file->settings->Live Templates->vue添加一个模板,并将代码模板复制到Template Text文本框中,在define中勾选HTML,点击ok或apply输入vue测试效果 1、编写vue代码模板 2、 file->s…
创建vue代码模板:
- 编写vue代码模板
- file->settings->Live Templates->vue添加一个模板,并将代码模板复制到Template Text文本框中,在define中勾选HTML,点击ok或apply
- 输入vue测试效果
1、编写vue代码模板

2、 file->settings->Live Templates->vue添加一个模板,并将代码模板复制到Template Text文本框中,在define中勾选HTML,点击ok或apply
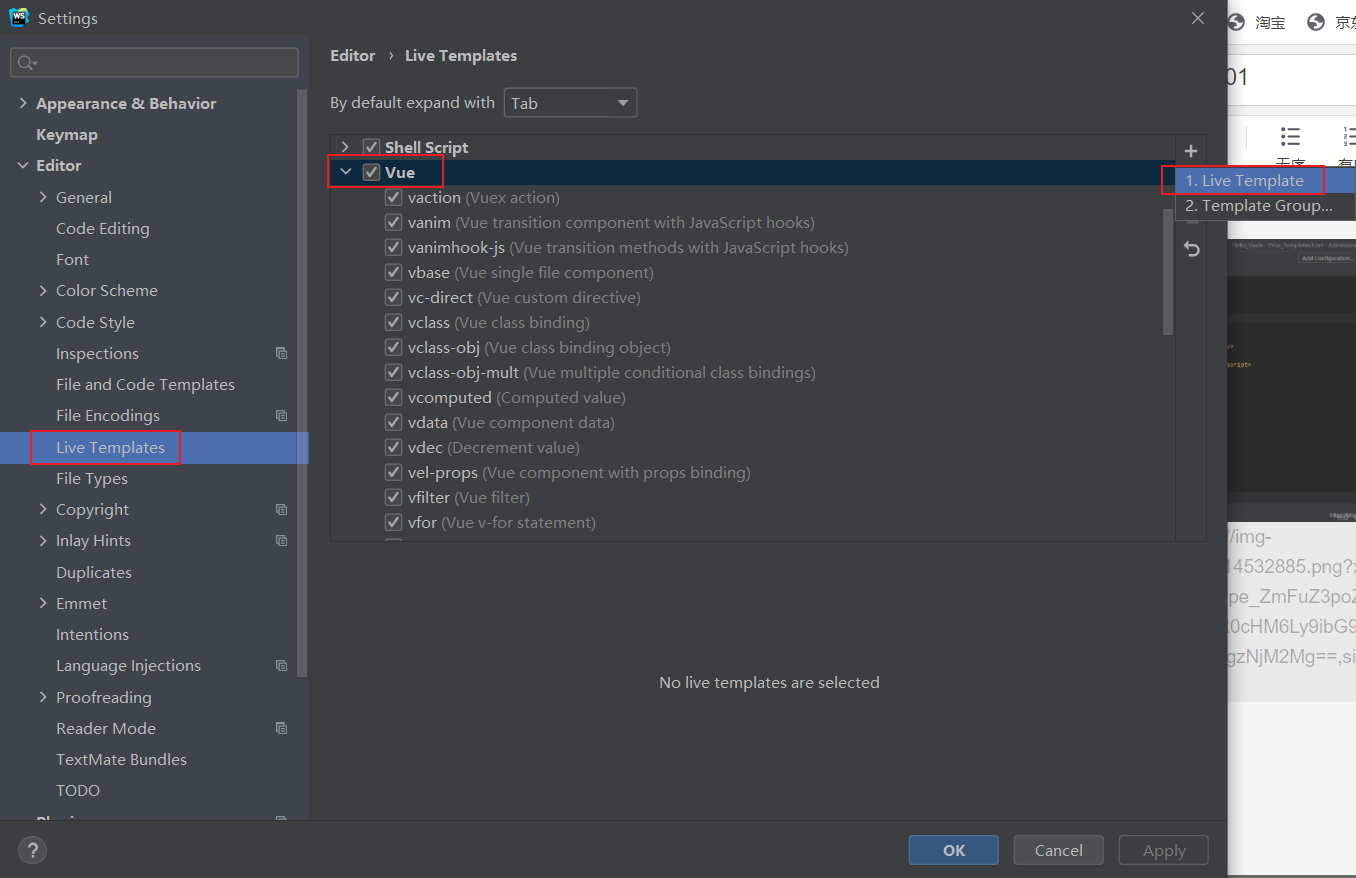

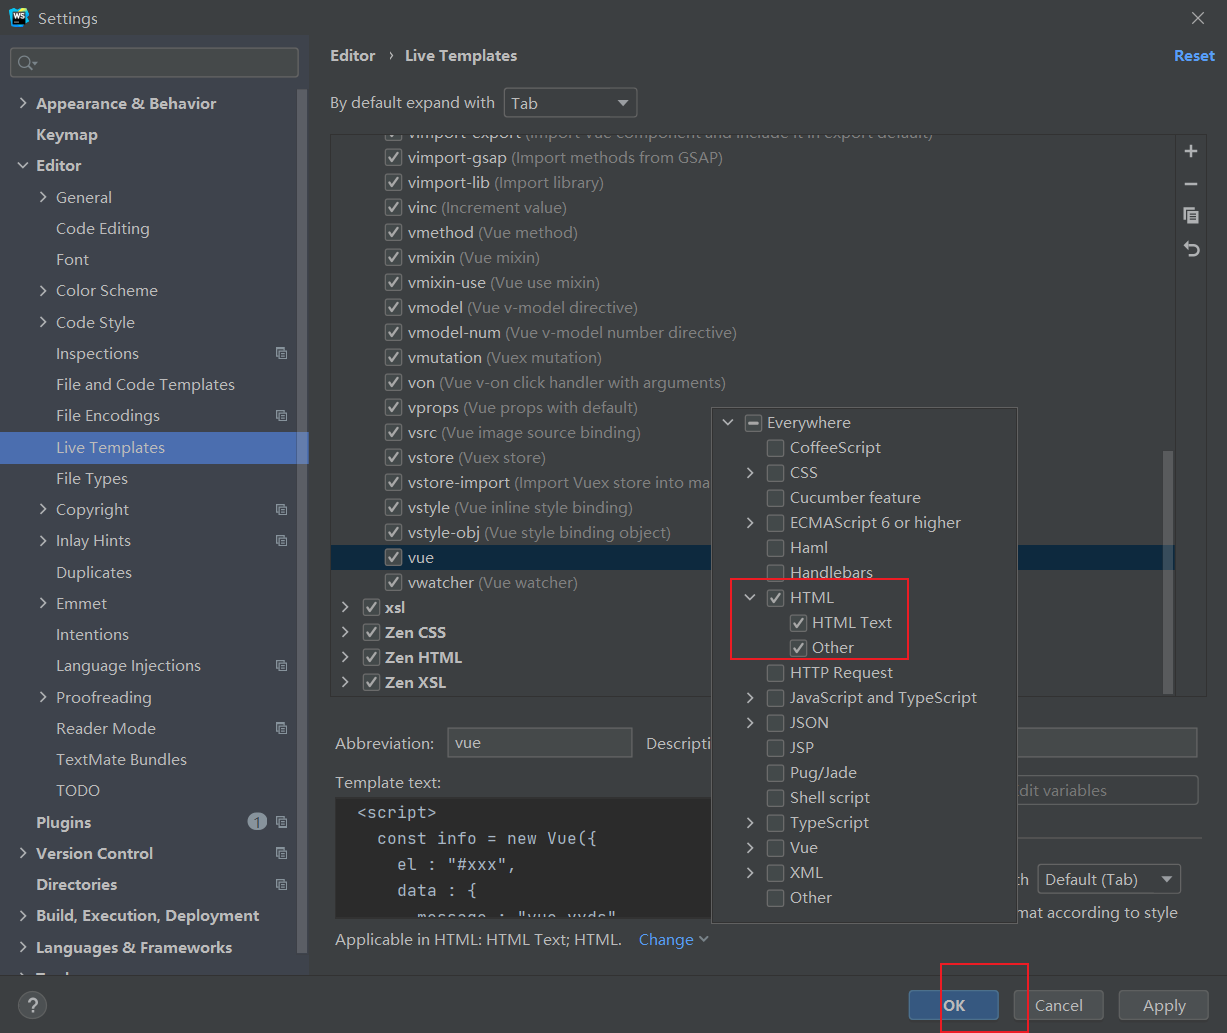
3、输入vue测试效果
自行测试噢>o<
vue基础语法
插值操作:将data中定义的数据插入到dom中显示出来。
mustache语法(双大括号语法):{{}}
1、 可以直接写变量,也可以写表达式(如a+’ '+b)
<!DOCTYPE html>
<html lang="en">
<head><meta charset="UTF-8"><title>1vue—mustache语法</title>
</head>
<body><div id="info"><h1>{{mes1 + ',' + mes2 + '!'}}</h1><h1>{{a + '+' + b + '=' + (a+b)}}</h1></div><script src="../../js/vue.js"></script><script>const info = new Vue({el : "#info",data : {mes1 : "音乐纯粹",mes2 : "爱V绝对",a : 1,b : 2},methods : {}})</script>
</body>
</html>

2、 相关指令
v-for:列表展示。v-for=“itme in list”(响应插入要用push!!)

插入一条数据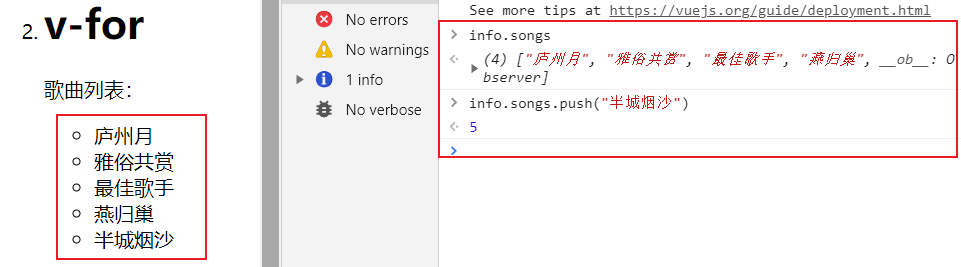
v-on:响应事件。v-on:xxx,如点击事件v-on:click=“event”
初始状态
点击’+'按钮,计数增加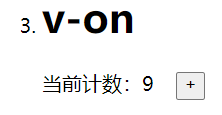
v-once: 不希望界面随意的跟随变量改变时
-
该指令表示元素和组件(组件后面才会学习)只渲染一次,不会随着数据的改变而改变。
-
该指令后面不需要跟任何表达式。
初始状态
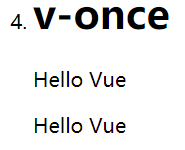
改变参数
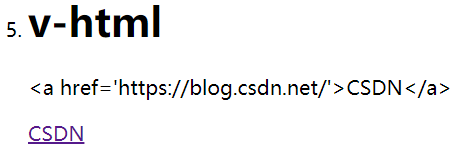
v-html:从服务器请求到的数据本身就是一个HTML代码时,按照HTML格式进行解析,并且显示对应的内容。
-
该指令后面往往会跟上一个string类型。
-
会将string的html解析出来并且进行渲染。
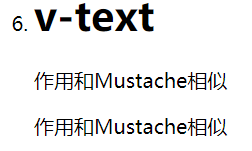
v-text: 用于将数据显示在界面中,一般接受的是一个string类型。(不够灵活,会覆盖,一般不用)
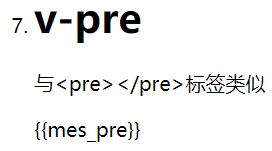
v-pre:用于跳过这个元素和它子元素的编译过程,直接显示原本的Mustache语法。与
<pre></pre>
标签类似
v-cloak:某些情况下浏览器可能会直接显然出未编译的Mustache标签。使用v-cloak可以实现遮挡效果,在未编译前实现v-cloak指令,编译后则取消v-cloak指令。(cloak斗篷),该指令基本不用。
自行测试,效果更佳>o<
相关指令实现效果代码
<!DOCTYPE html>
<html lang="en">
<head><meta charset="UTF-8"><title>1vue—mustache语法+一些指令</title><style>[v-cloak] {display:none;}</style>
</head>
<body><div id="info"><ol><li><h1>mustache语法 可使用表达式</h1><p>{{mes1 + ',' + mes2 + '!'}}</p><p>{{a + '+' + b + '=' + (a+b)}}</p></li><li><h1>v-for</h1><p>{{mes_for}}</p><ul><li v-for="item in songs">{{item}}</li></ul></li><li><h1>v-on</h1><p>当前计数:{{num}}   <button v-on:click = "add"> + </button></p></li><li><h1>v-once</h1><p>{{mes_once}}</p><p v-once>{{mes_once}}</p></li><li><h1>v-html</h1><p>{{url}}</p><p v-html = "url"></p></li><li><h1>v-text</h1><p>{{mes_text}}</p><p v-text="mes_text"></p></li><li><h1>v-pre</h1><p>{{mes_pre}}</p><p v-pre>{{mes_pre}}</p></li><li><h1>v-cloak</h1><p>{{mes_cloak}}</p><p v-cloak>{{mes_cloak}}</p></li></ol></div><script src="../../js/vue.js"></script><script>// 查看v-cloak指令效果时放开setTimeout// setTimeout(() =>{const info = new Vue({el : "#info",data : {//mustache语法mes1 : "音乐纯粹",mes2 : "爱V绝对",a : 1,b : 2,//v-formes_for: '歌曲列表:',songs: ['庐州月','雅俗共赏','最佳歌手','燕归巢'],// v-onnum : 0,// v-oncemes_once : 'Hello Vue',// v-htmlurl : "<a href='https://blog.csdn.net/'>CSDN</a>",// v-textmes_text : "作用和Mustache相似",// v-premes_pre : "与<pre></pre>标签类似",// v-cloakmes_cloak : "斗篷"},methods : {add : function (){this.num++;}}})// }, 1000)</script>
</body>
</html>
3、v-bind动态绑定
v-bind:动态绑定属性,可绑定一个或多个属性值。简写’:’
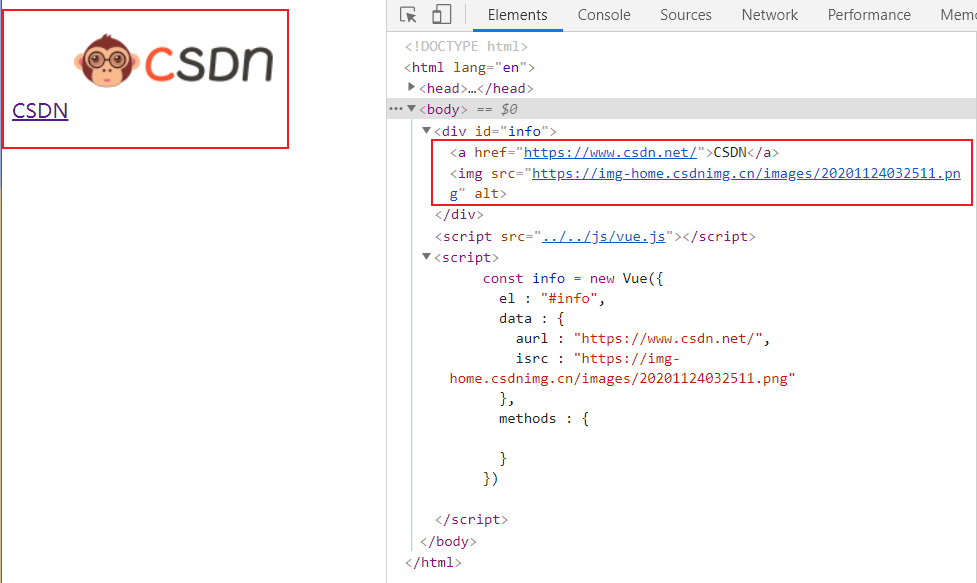
1、基本使用:动态绑定a标签的href和img标签的src。
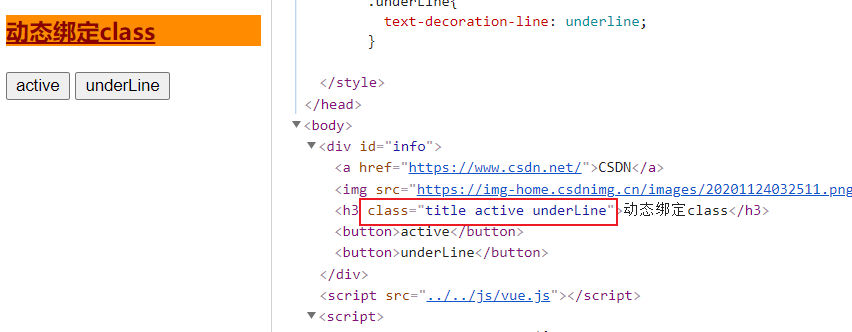
2、动态绑定class
对象语法:
:class = "类名1: boolean, 类名2: true/false"
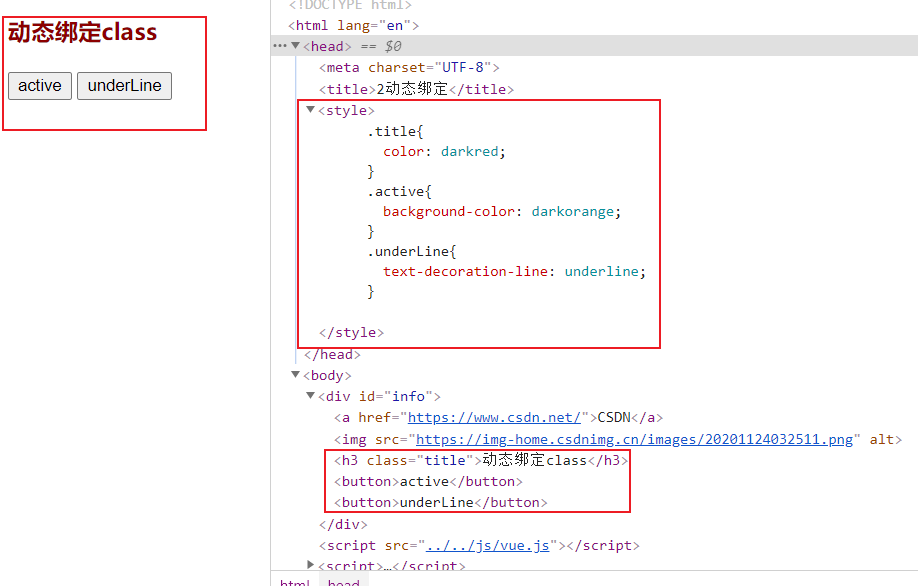
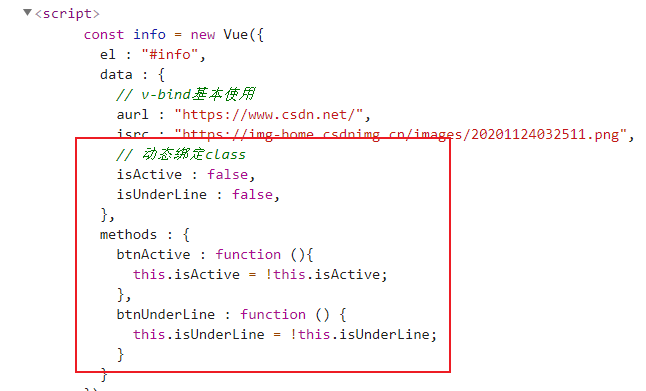
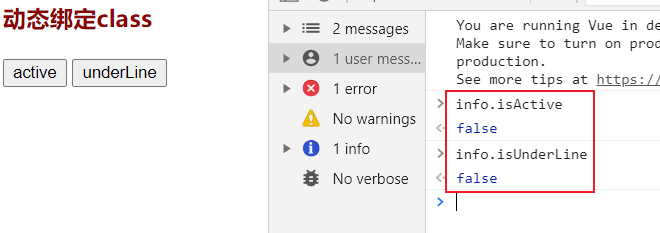
点击active按钮、underLine按钮

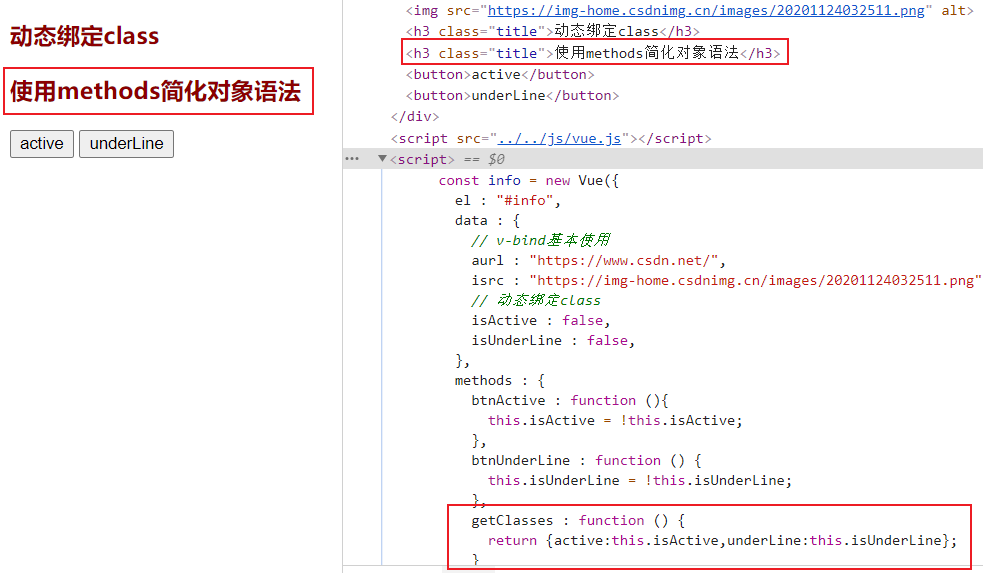
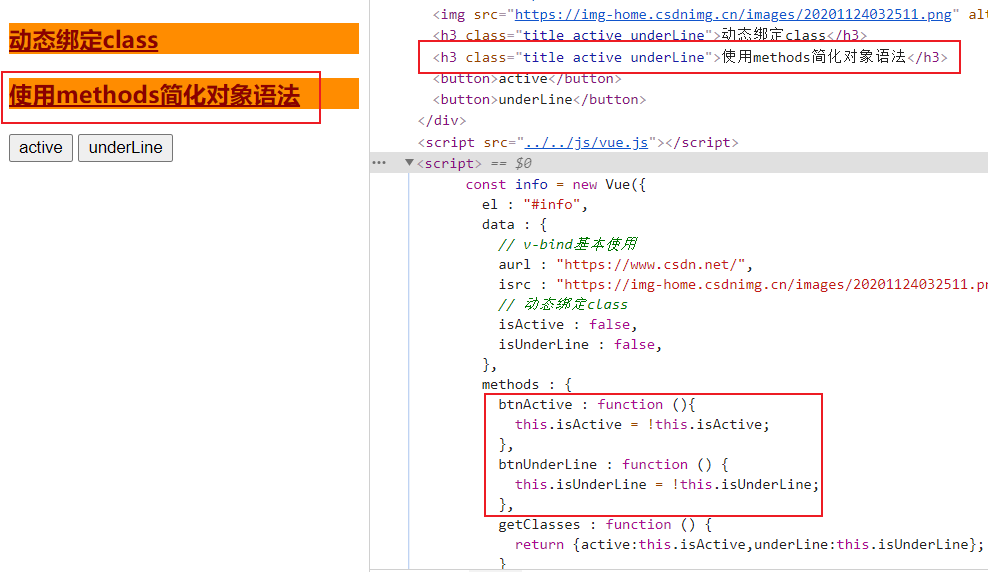
使用methods简化对象语法,点击active按钮、underLine按钮效果相同。
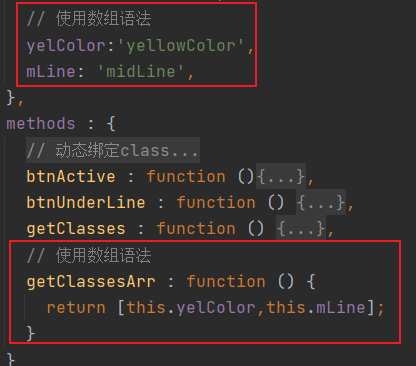
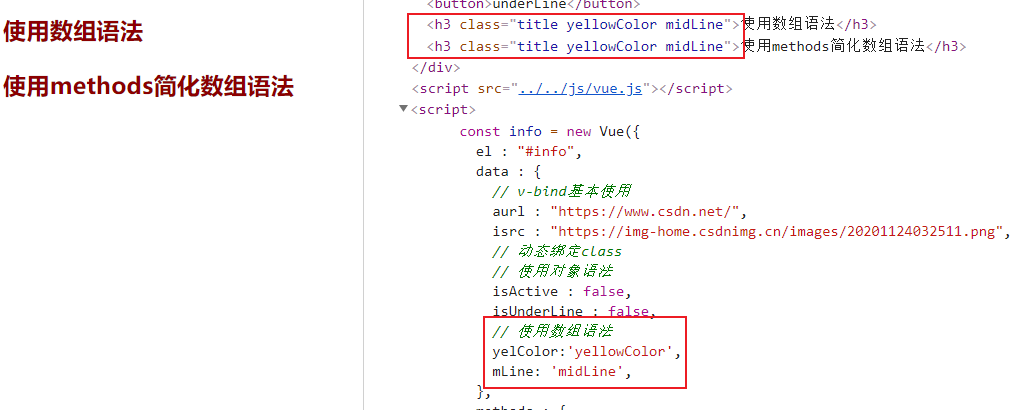
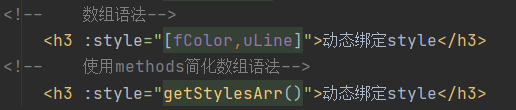
数组语法:一般不用
:class="[参数1,参数2]"(参数1、参数2为从服务器或其他地方传来的class属性的数据)
如:
<h3 class="title" :class="[yelColor,mLine]">使用数组语法</h3>
<!--    使用methods简化-->
<h3 class="title" :class="getClassesArr()">使用methods简化数组语法</h3>

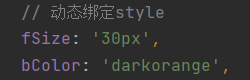
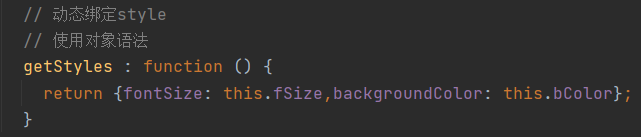
3、动态绑定style(与动态绑定class相似)
- 可以使用驼峰命名,如:fontSize;
- 可以使用短横线分隔(要用单引号括起来!!),如:‘font-size’
对象语法:
:style = "{css属性名1:属性值1,css属性名2:属性值2}"
普通对象语法+methods简化对象语法

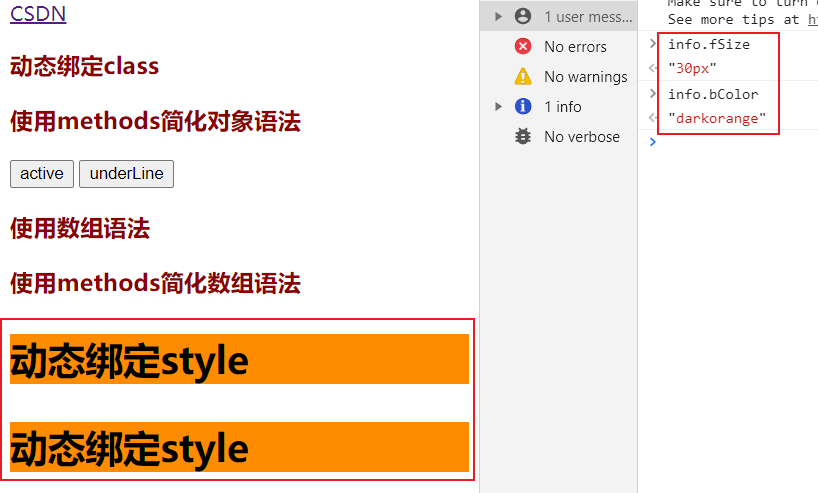
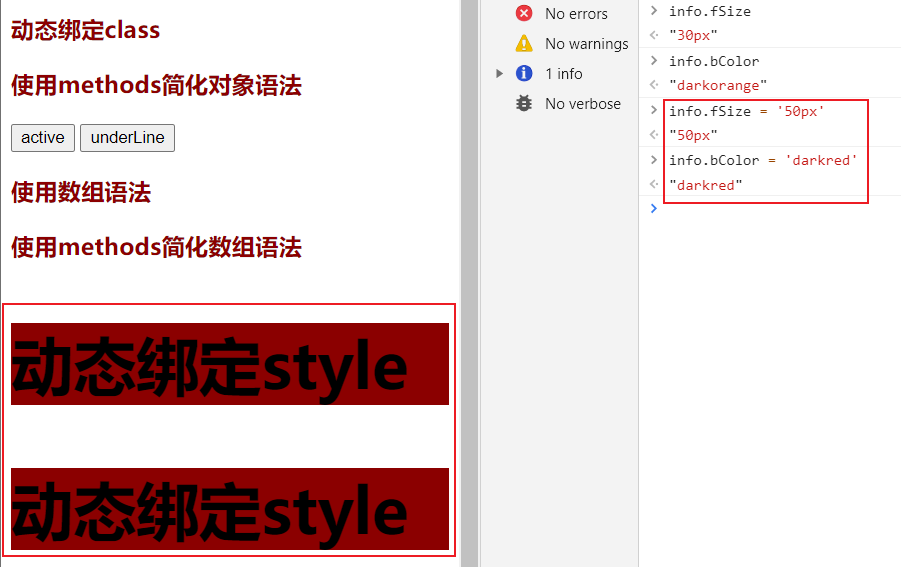
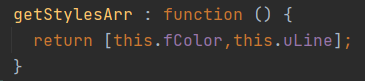
数组语法


测试代码
<!DOCTYPE html>
<html lang="en">
<head><meta charset="UTF-8"><title>2动态绑定</title><style>.title{color: darkred;}.active{background-color: darkorange;}.underLine{text-decoration-line: underline;}</style>
</head>
<body><div id="info">
<!--    v-bind基本使用--><a v-bind:href="aurl">CSDN</a>
<!--    v-bind简写':'--><img :src="isrc" alt=""><!--    动态绑定class-->
<!--    对象语法:第一个class中放固定的class属性.第二个class中存放的是一个对象,该对象中存放需要动态绑定的class属性--><h3 class="title" :class="{active:isActive,underLine:isUnderLine}">动态绑定class</h3>
<!--    使用methods简化对象语法--><h3 class="title" :class="getClasses()">使用methods简化对象语法</h3><button v-on:click="btnActive">active</button><button v-on:click="btnUnderLine">underLine</button><!--    使用数组语法--><h3 class="title" :class="[yelColor,mLine]">使用数组语法</h3>
<!--    使用methods简化--><h3 class="title" :class="getClassesArr()">使用methods简化数组语法</h3><!--    动态绑定style-->
<!--    对象语法--><h3 :style="{fontSize: fSize,backgroundColor: bColor}">动态绑定style</h3>
<!--    使用methods简化对象语法--><h3 :style="getStyles()">动态绑定style</h3>
<!--    数组语法--><h3 :style="[fColor,uLine]">动态绑定style</h3>
<!--    使用methods简化数组语法--><h3 :style="getStylesArr()">动态绑定style</h3></div><script src="../../js/vue.js"></script><script>const info = new Vue({el : "#info",data : {// v-bind基本使用aurl : "https://www.csdn.net/",isrc : "https://img-home.csdnimg.cn/images/20201124032511.png",// 动态绑定class// 使用对象语法isActive : false,isUnderLine : false,// 使用数组语法yelColor:'yellowColor',mLine: 'midLine',// 动态绑定style// 对象语法fSize: '30px',bColor: 'darkorange',// 数组语法fColor: {color: 'darkorange'},uLine: {'text-decoration-line': 'line-through'},},methods : {// 动态绑定class// 使用对象语法btnActive : function (){this.isActive = !this.isActive;},btnUnderLine : function () {this.isUnderLine = !this.isUnderLine;},getClasses : function () {return {active:this.isActive,underLine:this.isUnderLine};},// 使用数组语法getClassesArr : function () {return [this.yelColor,this.mLine];},// 动态绑定style// 使用对象语法getStyles : function () {return {fontSize: this.fSize,backgroundColor: this.bColor};},getStylesArr : function () {return [this.fColor,this.uLine];}}})</script>
</body>
</html>
4、条件判断v-if、v-else-if、v-else
- v-if、v-else-if、v-else与if、else if、else类似。
- v-if、v-else-if、v-else可以根据表达式的值在dom中渲染或销毁元素或组件。
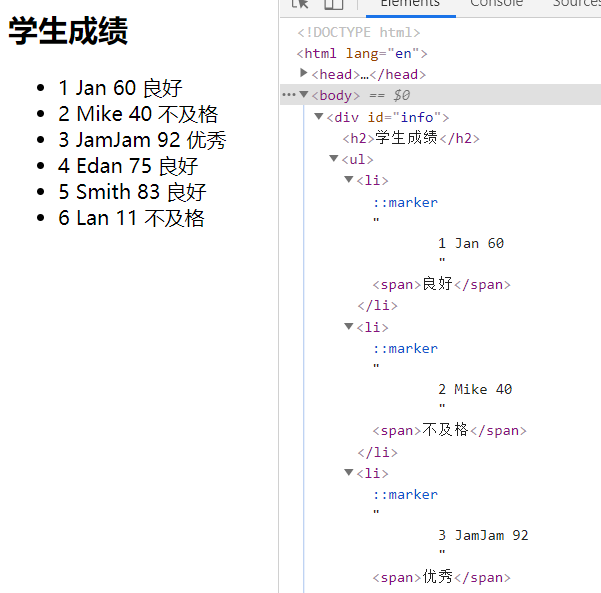
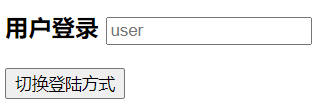
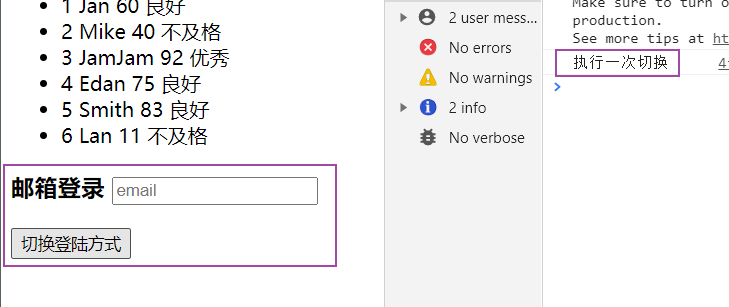
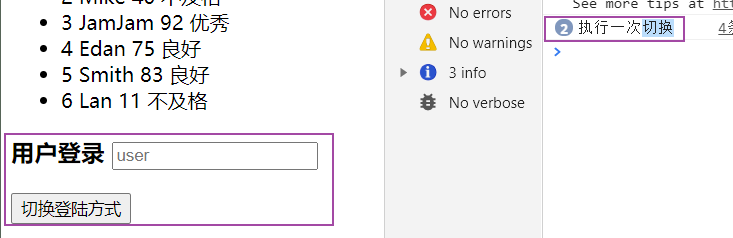
- v-if与v-show的区别:
v-if:条件为false,则对应的元素及其子元素不会被渲染,即dom中不会出现对应标签。只切换一次时优先选择v-if。
v-show:与v-if类似(决定一个元素是否被渲染)。条件为false时,对应的元素及其子元素被渲染,只是把该元素隐藏起来,即display属性设置为none。在显示和隐藏之间频繁切换时优先选择v-show。
初始状态为用户登录
点击一次切换登录方式按钮
再次点击切换登录按钮
测试代码
<!DOCTYPE html>
<html lang="en">
<head><meta charset="UTF-8"><title>4条件判断+v-show</title>
</head>
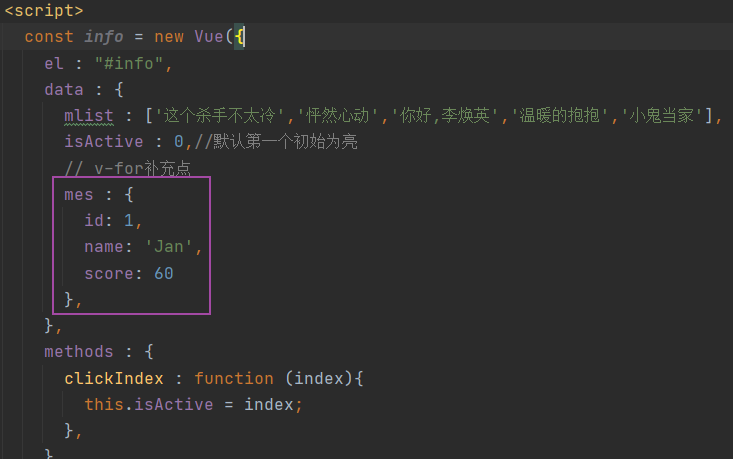
<body><div id="info"><h2>学生成绩</h2><ul><li v-for="s in stu">{{s.id + ' ' + s.name + ' ' + s.score + ' '}}<span v-if="s.score >= 90">优秀</span><span v-else-if="s.score >= 60">良好</span><span v-else>不及格</span></li></ul><div><h3 v-show="loginWay === 'user'">用户登录<input type="text" placeholder="user"></h3><h3 v-show="loginWay === 'email'">邮箱登录<input type="text" placeholder="email"></h3><button @click="changeLoginWay">切换登陆方式</button></div></div><script src="../../js/vue.js"></script><script>const info = new Vue({el : "#info",data : {stu : [{id : 1, name: 'Jan', score: 60},{id : 2, name: 'Mike', score: 40},{id : 3, name: 'JamJam', score: 92},{id : 4, name: 'Edan', score: 75},{id : 5, name: 'Smith', score: 83},{id : 6, name: 'Lan', score: 11},],loginWay : 'user',},methods : {changeLoginWay : function () {this.loginWay = (this.loginWay === 'user')? 'email':'user';console.log('执行一次切换');}}})</script>
</body>
</html>
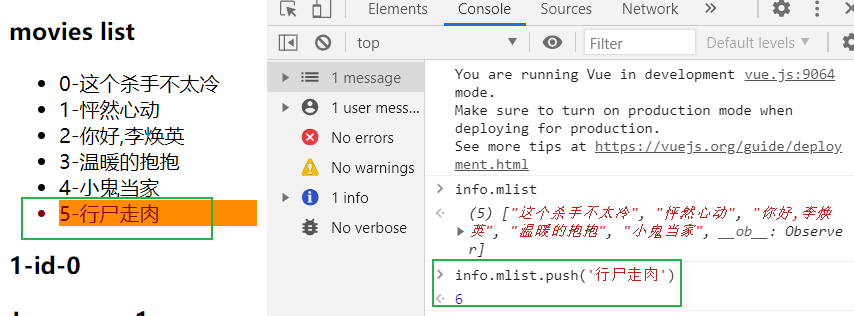
5、数组中的响应式方法:push、pop、shift、unshift、sort、reverse、splice
初始状态
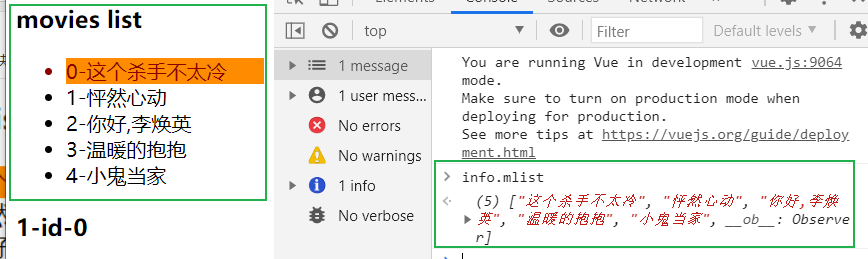
push:在数组末尾添加一个数据
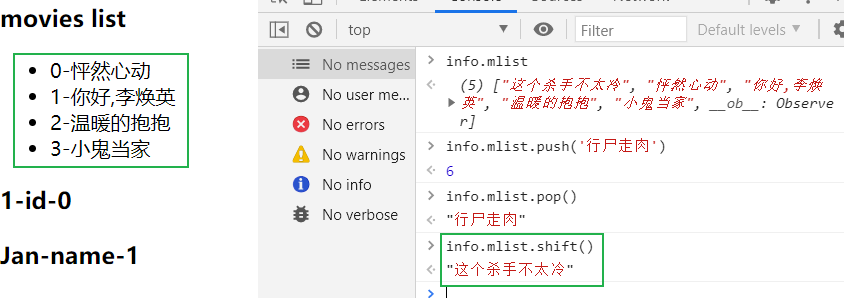
pop:从数组末尾删除一个数据

shift:从数组头部删除一个数据
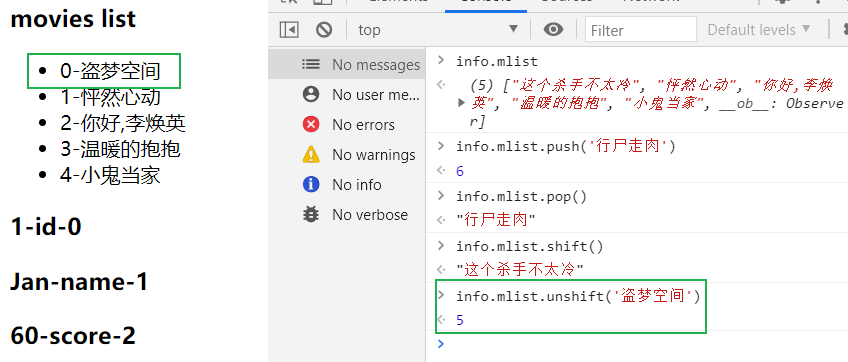
unshift:从数组头部添加一个数据
sort:给数组内的数据排序,按升序排列数组项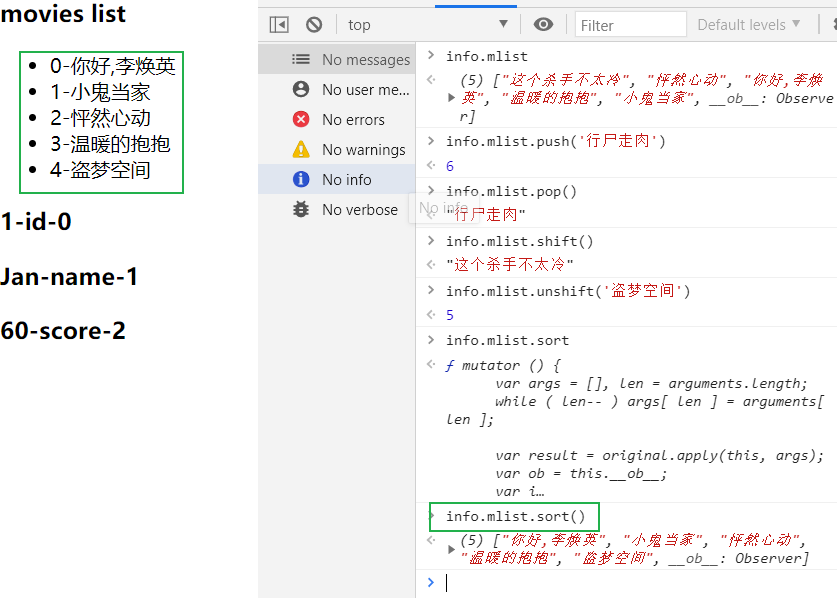
reverse:反转sort排序的顺序

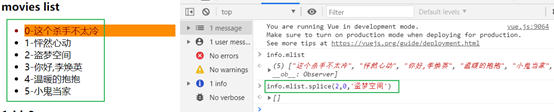
splice:用于插入、删除或替换数组的元素。
初始状态
插入
删除
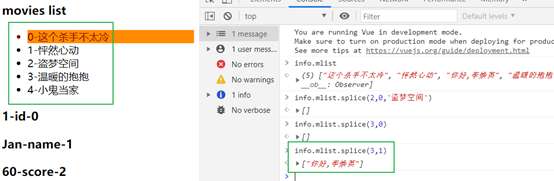
替换
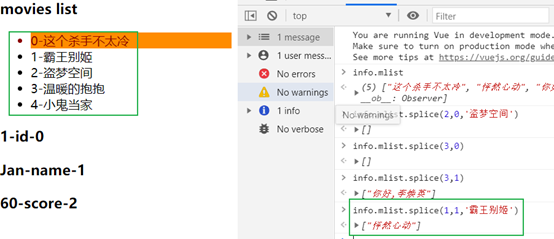
补充:
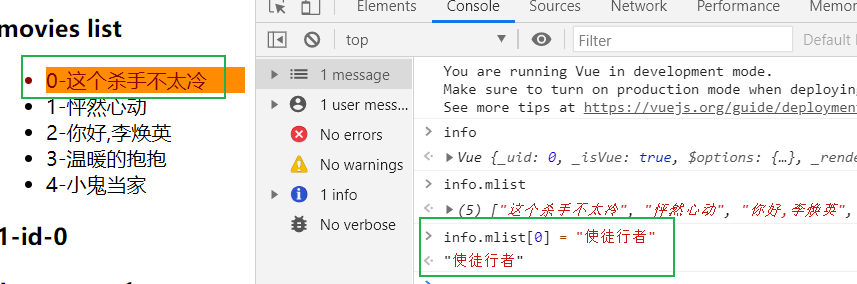
- vue.set方法: 替换指定数组指定下标的元素,每次只能替换一个元素。
<ul><li v-for="(item,index) in mlist" v-on:click="clickIndex(index)" class="hand" :class="{active:index == isActive}">{{index + '-' + item}}</li>
</ul>
<button @click="setClick">vue.set方法</button>
……
setClick(){// Vue.set替换指定数组指定下标的元素// Vue.set(要处理的数组, 索引值, 替换的元素);Vue.set(this.mlist, 1, '法证先锋','使徒行者');
}
初始状态
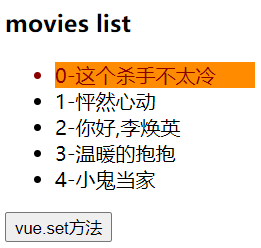
点击vue.set按钮
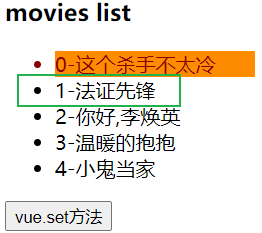
- 根据索引改变数组中的值没有响应式效果
6、表单绑定v-model
Vue中使用v-model实现表单元素和数据的双向绑定。
v-model实质包含两个操作:
- v-bind绑定一个value元素
- v-on给当前元素绑定input指令
表单控件相关测试
初始状态

输入相关信息,表格内容随之改变

<!DOCTYPE html>
<html lang="en">
<head><meta charset="UTF-8"><title>6v-model与表单控件</title>
</head>
<body><div id="info"><form action="">
<!-- 文本框--><div>姓名:<input type="text" v-model.lazy="name"></div><div>年龄:<input type="number" v-model="age"></div>
<!-- 单选框--><div>性别:<input type="radio" value="male" v-model="sex">男  <input type="radio" value="famale" v-model="sex">女</div>
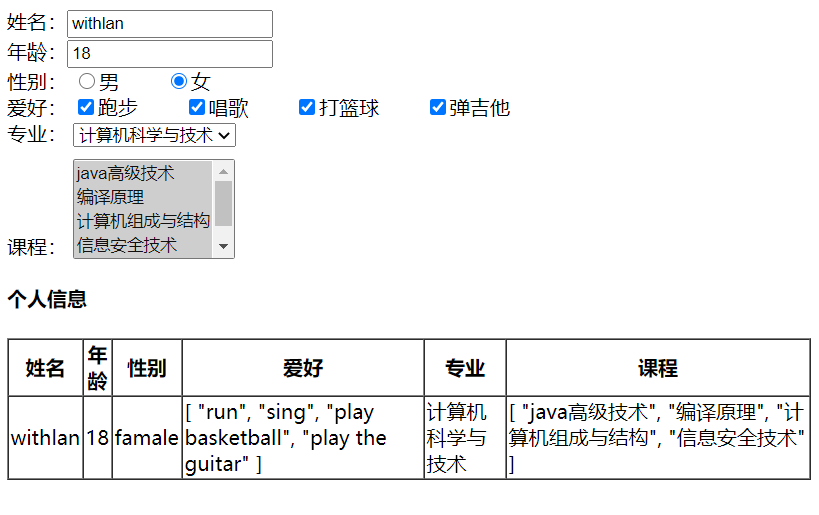
<!-- 多选框--><div>爱好:<input type="checkbox" value="run" v-model="hobby">跑步  <input type="checkbox" value="sing" v-model="hobby">唱歌  <input type="checkbox" value="play basketball" v-model="hobby">打篮球  <input type="checkbox" value="play the guitar" v-model="hobby">弹吉他  </div>
<!-- 下拉框--><div style="margin-bottom: 10px;">专业:<select name="major" v-model="major"><option value="数字媒体技术">数字媒体技术</option><option value="计算机科学与技术">计算机科学与技术</option><option value="物联网">物联网</option><option value="大数据">大数据</option></select></div><div>课程:<select name="cource" v-model="cource" multiple ><option value="java高级技术">java高级技术</option><option value="编译原理">编译原理</option><option value="计算机组成与结构">计算机组成与结构</option><option value="信息安全技术">信息安全技术</option><option value="形势与政策">形势与政策</option></select></div><div style="margin-top: 20px;">备注:<textarea cols="40" rows="3" v-model.trim="comment"></textarea></div></form>
<!-- 动态显示个人信息--><div><h4>个人信息</h4><table cellspacing="0" border="1"><thead><tr><th>姓名</th><th>年龄</th><th>性别</th><th>爱好</th><th>专业</th><th>课程</th><th>备注</th></tr></thead><tbody><tr><td>{{name}}</td><td>{{age}}</td><td>{{sex}}</td><td>{{hobby}}</td><td>{{major}}</td><td>{{cource}}</td><td>{{comment}}</td></tr></tbody></table></div></div><script src="../../js/vue.js"></script><script>const info = new Vue({el : "#info",data : {name: "",age: "",sex: "male",hobby: [],major: "数字媒体技术",cource: [],comment: "",},methods : {}})</script>
</body>
</html>
补充:
- lazy修饰符:默认情况下数据发生改变时对应的data中的数据随之自动改变,使用lazy修饰符可以让数据在失去焦点或会车时才更新
<input type="text" v-model.lazy="name">
- trim修饰符:过滤内容左右两边的空格
<textarea cols="40" rows="3" v-model.trim="comment"></textarea>

- 默认情况下input框中的内容都会被当做字符串处理,若希望被处理的是数字类型,则直接定义为type=“number”
<input type="number" v-model="age">
v-for+v-blind结合使用的小测试
制作一个列表,当点击列表中某项时该项被点亮,默认初始状态下第一项被点亮。
实现思路:
1.使用v-for:"(item,index) in list"制作列表,此处需要获取序列号;
2. 通过点击事件使得isActive变量与点击的序列号保持一致;
3. 使用v:class="{active:true/false}"判断是否获得active属性:通过比较isActive的值和列表中每一项的序列号,若相等则该项获得active属性被点亮,反之则不被点亮。
实现代码:
<!DOCTYPE html>
<html lang="en">
<head><meta charset="UTF-8"><title>3v-for+v-blind小测试</title><style>.active{color: darkred;background-color: darkorange;}.hand{cursor: pointer;}</style>
</head>
<body><div id="info"><h3>movies list</h3><ul>
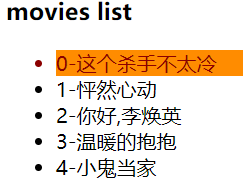
<!-- 当点击到某个li时,统一isActive和index的值,通过比较index与isActive是否相等点亮某个节点--><li v-for="(item,index) in mlist" v-on:click="clickIndex(index)" class="hand" :class="{active:index == isActive}">{{index + '-' + item}}</li></ul></div><script src="../../js/vue.js"></script><script>const info = new Vue({el : "#info",data : {mlist : ['这个杀手不太冷','怦然心动','你好,李焕英','温暖的抱抱','小鬼当家'],isActive : 0,//默认第一个初始为亮},methods : {clickIndex : function (index){this.isActive = index;},}})</script>
</body>
</html>
v-for补充

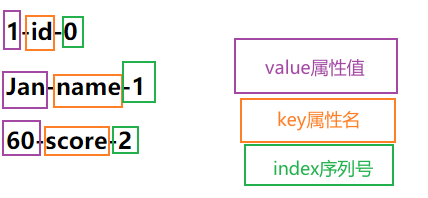
用key给每个属性做一个唯一标识,使得能够高效的更新虚拟dom。
补充知识点
CLI脚手架:自动规范vue目录结构和文件等。
封装单独的组件可复用:如导航栏 navbar.vue